Selenium Remote Control環境をDockerで構築する
この記事のまとめ:
- Seleniumによるブラウザの自動制御を行うサーバーを立ち上げ、リモートで制御するSelenium Remote Control環境をDockerで構築する方法をまとめています。
- Dockerで構築したSeleniumサーバーをPythonから制御するサンプルコードを紹介しています。
背景
これまでスクレイピングを行うために何気なくネイティブ環境にブラウザをインストールしてSeleniumドライバーを使ってSeleniumを使っていたのですが、スクレイピングのプログラムをDockerコンテナ化しようと思ったときに同じようにコンテナ内にブラウザをインストールするのもちょっとイケてない感じがしたので、Seleniumリモートコントロール環境をDockerで構築してみましたので、その手順をまとめています。
Seleniumとは
正直何気なく使っていたのでSeleniumは、ブラウザを自動制御するためのドライバーとしか理解していなかったのですが、それはそれで正しいものの、Seleniumにはリモートでブラウザを操作するSelenium Remote Controlというアーキテクチャがあることを今回Dockerコンテナ化する際に気付かされました。
Selenium Remote Control (Selenium RC)
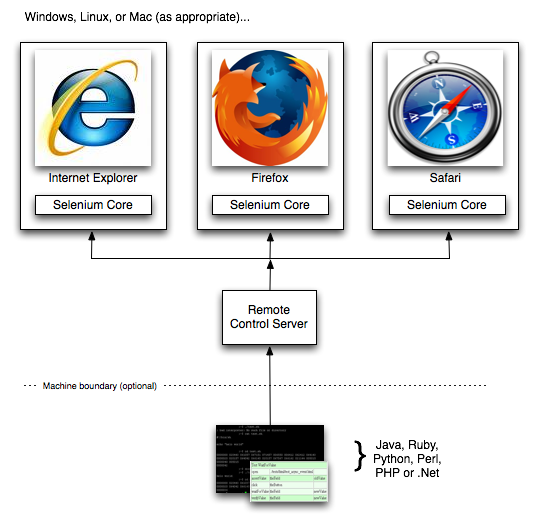
Selenium RCは次のようにサーバーとクライアントと2つから構成されます。

(参照:公式HPより)
それぞれ次のように説明されています。
Selenium RC components are:
- The Selenium Server which launches and kills browsers, interprets and runs the Selenese commands passed from the test program, and acts as an HTTP proxy, intercepting and verifying HTTP messages passed between the browser and the AUT.
- Client libraries which provide the interface between each programming language and the Selenium RC Server.
要するに、Selenium RCとは、ネイティブ環境でブラウザとそれを使ったテストなどを動かすわけでなく、サーバー側で実行を行い、クライアントはライブラリが提供するインターフェースを通じでサーバー側での実行を制御するということです。
したがって、今回Dockerコンテナ化する対象はサーバー側です。
コンテナ化の話の前に、Seleniumサーバーのアーキテクチャについてもう一つ理解しておくことがあります。それはStandaloneとSelenium Gridです。
Selenium Grid
Seleniumサーバーのアーキテクチャとして、StandaloneとGridがあります。
Standaloneは言葉の通り、単体でSeleniumサーバーとして動作するアーキテクチャです。
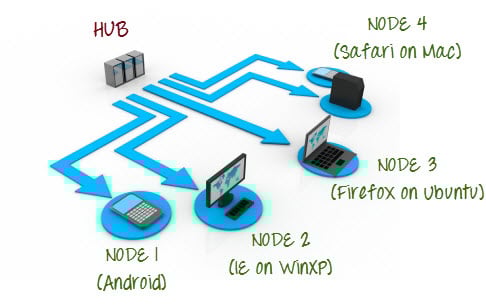
一方、Gridは複数のサーバーで構成され、スケーラブルに処理の分散、並列化を行うアーキテクチャで、異なる環境での自動テストや処理の高速化を行うための仕組みです。
Selenium Gridは、1台のHubと複数のNodeで構成され、HubはNodeに対してテストの実行を指示し、Nodeがそのテスト自体を実行します。

(参照:Guru99)
Selenium Gridの詳細については、次の記事など参考になると思います。
- 公式Wiki: https://github.com/SeleniumHQ/selenium/wiki/Grid2
- Selenium Grid Tutorial: Hub & Node (with Example)
次に紹介するSelenium Dockerには、大きく分けてStandalone、Hub、Nodeの3つのコンテナイメージがあるため、どのコンテナイメージがどういった用途の場合に必要になるかこれで分かったと思います。
Selenium Docker
SeleniumのDockerコンテナイメージは公式のGithub 上にありますが有志でつくられているようです。ただ、しっかりメンテナンスもされているようなのでこちらのDockerコンテナを使っていくことを考えます。
Selenium Docker The project is made possible by volunteer contributors who have put in thousands of hours of their own time, and made the source code freely available under the Apache License 2.0.
Standalone
StandaloneでSeleniumを動かす場合は、次のコンテナイメージを使用すればよいです。なお、Chrome用とFirefox用のそれぞれにdebugというものがありますが、これらはSeleniumでブラウザを操作するときに実際にどのような操作をしているのかブラウザの表示画面をVNCで見ることができます。
- Standalone
- selenium/standalone-chrome: Selenium Standalone with Chrome installed
- selenium/standalone-firefox: Selenium Standalone with Firefox installed
- selenium/standalone-chrome-debug: Selenium Standalone with Chrome installed and runs a VNC server
- selenium/standalone-firefox-debug: Selenium Standalone with Firefox installed and runs a VNC server
Selenium Grid
Selenium Gridのアーキテクチャで用いるコンポーネントはそれぞれ下記のイメージです。
- Hub
- selenium/hub: Image for running a Grid Hub
- Node
- selenium/node-chrome: Grid Node with Chrome installed, needs to be connected to a Grid Hub
- selenium/node-firefox: Grid Node with Firefox installed, needs to be connected to a Grid Hub
- selenium/node-chrome-debug: Grid Node with Chrome installed and runs a VNC server, needs to be connected to a Grid Hub
- selenium/node-firefox-debug: Grid Node with Firefox installed and runs a VNC server, needs to be connected to a Grid Hub
サンプルコード
それでは非常にシンプルに、StandaloneサーバーをDockerで立てて、任意のページのHTMLをPythonでスクレイピングしてみたいと思います。
また、お試しでVNCにもつないでみようと思いますので今回はselenium/standalone-chrome-debugのイメージを使用してみます。
Dockerコマンドで実行するなら次の通りです。
dokcer-compose.ymlファイルとして書くならこのようになります。
Docker-composeでの実行はdocker-compose.ymlファイルがあるディレクトリににおいて下記を実行します。
まずはVNCをつないでみましょう。上記のDockerイメージを実行したIPアドレスとVNC用ポート(5700番)にVNCクライアントから接続します。私はUltraVNCクライアントを使用しています。
接続する際にパスワードが必要ですが「secret」を入力すれば通ります。
そうすると次のような画面が表示されます。まだ何も開いていないので特に何も表示されていません。
それでは、PythonでSeleniumサーバーを操作して、今回は私のTwitterを開いてみます。
下記がサンプルコードです。事前にpipなどでseleniumパッケージのインストールをしておいてください。また、5行目のseleniumサーバーのIPアドレスは上記のDockerイメージを実行したマシンのIPアドレスに変更してください。
実行結果については非常に長いのでここに乗せることは避けますが、HTMLのコードが表示されたと思います。スクレイピングされる方は、そのHTMLをBeautifulSoupなど使って分析すればよいかと思います。
またそれと同時にVNCクライアントの表示にも次のように変化があるかと思います。
非常にシンプルですがSelenium RCをDockerで使えるようになりました。
今回は以上です。 最後まで読んでいただき、ありがとうございます。
関連記事
Pythonでウェブスクレイピング Pythonでウェブスクレイピング(ウェブクローリング)する上で基本的な処理として下記を紹介しています。
Apache Airflow入門 Apache Airflow初心者がAirflowのアーキテクチャを理解し、チュートリアルを動かすまでの手順をまとめています。


コメント
コメントを投稿